How To Tarp Your Roof, Step by Step
Your roof is leaking, there’s more rain coming, and you need to protect your home right now. Maybe a storm just rolled through, maybe a tree branch fell, or maybe you just discovered damage you didn’t know was there. Whatever brought you here, let’s get that roof covered quickly and correctly.
Step 1: Check If It’s Safe to Go Up
Look, I know you want to fix this immediately, but take 30 seconds to check these things:
- No lightning or severe weather happening right now
- Wind is under 30 mph (if trees are swaying hard, wait)
- You can see where you’re stepping (avoid working in the dark)
- The roof structure looks solid (no obvious sagging or damage)
Note: If any of these are a “no,” please wait or call a professional. Water damage is expensive, but hospital bills are worse.
Step 2: Clear the Damaged Area
Once you’re safely on the roof, clear away any loose debris, branches, or obviously damaged shingles around the problem area. You’re not trying to fix anything yet – just making a cleaner surface for the tarp to lay on. If you see nails sticking up, hammer them down. Sharp edges will tear your tarp later.
Quick Tip: Take photos of the damage before covering it. Your insurance company will want these later, and once the tarp is on, you won’t be able to get good pictures.
Step 3: Roll Out Your Tarp
Here’s the key to getting this right: your tarp needs to extend at least 4 feet past the damaged area on all sides. More is better. If possible, drape it over the peak of your roof so water runs off naturally.
Start unrolling from the bottom of the damaged area and work your way up. If you’re working alone (though having help is really better), unroll a section, secure it, then unroll more. Don’t let the whole tarp loose at once – wind will turn it into a giant sail.
The ideal setup looks like this: tarp goes completely over the roof peak and down the other side at least a foot. This way, water can’t get under the top edge. If your tarp isn’t big enough to go over the peak, that’s okay – we’ll seal that edge extra well in the next step.
Step 4: Secure the Top Edge
The top edge is where most tarp jobs fail, so let’s get this right. Take one of your 2×4 boards and roll the top edge of the tarp around it at least twice. This creates a water barrier and gives you something solid to nail through.
Now nail or screw through the board, tarp, and into the roof every 12-16 inches. Use 3-inch fasteners to make sure you’re hitting solid wood underneath, not just shingles. If your tarp doesn’t go over the peak, run a thick bead of roofing cement under the tarp edge before securing the board. This creates a waterproof seal.
Step 5: Secure the Sides and Bottom
Use the same board-wrapping technique for the sides and bottom edges. Here’s how:
- Wrap the tarp edge around a 2×4 twice
- Position the wrapped board along the edge
- Nail or screw every 12-16 inches
The bottom edge is especially important because wind loves to get under there and rip tarps off. Consider doubling up your boards on the bottom or adding some extra weight like sandbags if you have them.
Step 6: Prevent Wind Damage (The Part Most People Skip)
Your tarp might look secure, but large sections of unsecured tarp will flap in the wind and eventually tear. Here’s the fix: lay additional 2×4 boards across the middle of the tarp, running perpendicular to the roof slope (horizontally). Space them about 4 feet apart and screw them down at the ends. These act like battens to hold the middle of the tarp down.
If you have any vents, pipes, or chimneys sticking through the roof, don’t cut holes in your tarp. Instead, work the tarp around them and seal the edges with roofing cement or tarp tape. Cutting holes almost always leads to leaks.
Step 7: Do a Final Check
Walk around and check that:
- All edges are secured tightly
- No loose corners are flapping
- Water will run off the tarp, not pool on it
- The tarp extends well beyond the damaged area
How Long Will This Tarp Last?
Let’s be realistic about what you’ve just done. This is a temporary fix, not a permanent solution. Here’s what to expect:
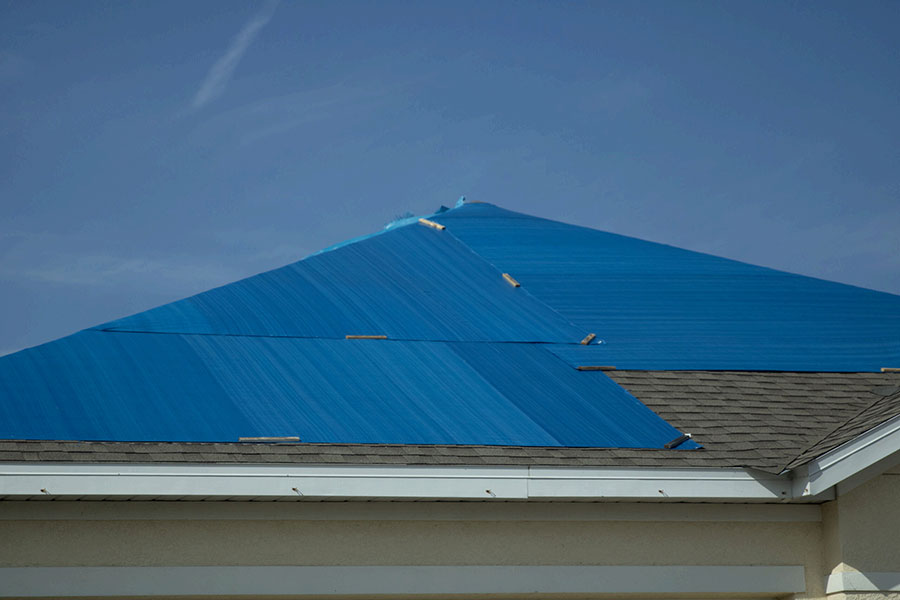
A properly installed tarp with good materials will typically last 30-90 days depending on weather conditions. Blue tarps break down fastest in sunlight and might only give you 30 days. Silver or white UV-resistant tarps can make it 60-90 days. If you live somewhere with intense sun, harsh winters, or frequent storms, expect the shorter end of that range.
Check your tarp after any significant weather event and at least once a week. Look for tears, loose edges, or areas where water is pooling. Small problems become big ones fast if you ignore them. Keep some tarp tape handy for quick repairs.
Why Different Roof Types Need Different Approaches
Not all roofs are created equal. Here’s how to adjust your approach:
- Flat or low-slope roofs are actually trickier because water doesn’t run off naturally. You’ll need to create some slope with your tarp installation, maybe propping up sections with boards underneath to direct water toward drains.
- Steep roofs are dangerous but actually easier to tarp because water runs off well. The challenge is working safely. If your roof is steeper than you can comfortably walk on, this is a job for professionals with proper safety equipment.
- Complex roofs with valleys, dormers, or multiple levels usually need multiple tarps with careful overlapping. Start from the bottom and work up, making sure higher tarps overlap lower ones by at least 2 feet. Think of it like shingling in reverse.
Common Mistakes That Make Things Worse
After seeing hundreds of failed tarp jobs, here are the mistakes that cause 90% of failures:
Using too Small of a Tarp
Using too small a tarp is the biggest one. People buy a tarp that barely covers the hole, not realizing rain doesn’t fall straight down. Wind drives rain sideways. Your tarp needs to be oversized to work.
Not Securing the Middle
Not securing the middle is another common issue. People nail down the edges and call it done, but then the middle section becomes a giant sail. Those horizontal boards across the middle aren’t optional if you want the tarp to survive the first windy night.
Creating New Leak Paths
Creating new leak paths happens when people don’t think about water flow. Your tarp should direct water away from damage and into gutters, not channel it somewhere new. Always think: where will the water go?
Overtightening the Tarp
Overtightening the tarp seems logical but actually causes problems. A drum-tight tarp can’t flex with the wind and will tear. Leave just a tiny bit of slack for movement.
Winter Tarping Challenges
Snow creates unique problems for tarped roofs. The weight can be enormous, as wet snow can weigh 20 pounds per cubic foot. Your tarp won’t shed snow like shingles do, so you’ll need to carefully remove accumulation.
Use a roof rake from the ground if possible. If you must go up, be extremely careful not to tear the tarp. Never try to chip ice off. Let it melt naturally or use ice melt products designed for roofs. Consider building a steeper temporary frame over the damaged area to help snow slide off.
What to Do After Tarping Your Roof
Once your tarp is up and your home is protected, here’s your game plan:
- Week 1: Contact your insurance company, get multiple repair estimates, and check the tarp daily for any issues.
- Week 2-4: Schedule permanent repairs. If it’s peak season after a major storm, this might take longer. Keep checking that tarp and make small repairs as needed.
- Month 2: If repairs are delayed, consider replacing your tarp preemptively. Better to replace it on a nice day than deal with failure during a storm.
- Ongoing: Keep monitoring weather forecasts. If severe weather is coming, reinforce your tarp or have a professional check it.
The Bottom Line About Roof Tarps
Remember, this is meant to buy you time, not be a long-term solution. Use that time wisely to get roof repairs scheduled. Document everything for insurance, monitor the tarp regularly, and stay safe up there. Lastly, keep in mind that no amount of property damage is worth risking injury. If conditions aren’t right or you’re not comfortable with any part of this process, make the call and get professional help.
Frequently Asked Questions
What is roof tarping?
How long can you leave a tarp on a roof?
How do you secure a tarp on a roof?
How do you tarp a roof without nails?
What should you use to hold down a tarp?
Hulsey Roofing proudly serves homeowners in Mehlville, Fenton, Imperial, and beyond. We’ve been helping homeowners through roof emergencies for 40+ years. We handle everything from storm damage assessments to complete roof replacements, and yes, we work with all insurance companies to make the process as painless as possible. Get in touch today!