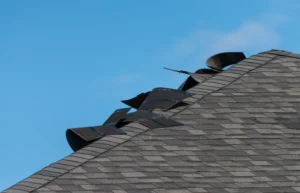

That green fuzzy stuff growing on your roof might look quaint and cottage-like, but it’s actually slowly destroying your shingles. If you’ve noticed moss creeping across your roof, especially on the north-facing slopes that don’t get much sun, you’re right to be concerned. Left unchecked, moss can cut years off your roof’s life and lead to expensive repairs or premature replacement.
The good news? Getting rid of moss on your roof is totally doable, whether you tackle it yourself or hire help. And once you know what causes it and how to prevent it, you can keep it from coming back. Let’s walk through exactly how to remove roof moss safely and effectively, plus how to make sure it doesn’t return next season.
But first, let’s be clear about one thing: this isn’t just a cosmetic issue. Moss is literally eating your roof, one shingle at a time.
Why Moss on Your Roof Is Actually a Big Problem
Before we jump into removal methods, you need to understand why that innocent-looking moss is such bad news for your roof. This isn’t about being a perfectionist homeowner – it’s about protecting a major investment.
Moss acts like a sponge, holding moisture against your roof surface. Unlike water that runs off, moss-trapped moisture sits there, working its way under shingles and into the roof deck. In winter, this trapped water freezes and expands, literally prying your shingles apart. It’s like having hundreds of tiny crowbars working on your roof 24/7.
As moss grows, its root-like structures called rhizoids work their way into and under shingles, creating channels for water to penetrate your roof’s protective layers. These rhizoids might be microscopic, but collectively they’re strong enough to lift shingle edges and compromise the seal that keeps water out. Once that seal is broken, you’re looking at potential leaks, rot, and structural damage.
The weight of wet moss shouldn’t be ignored either. A thick moss covering can add hundreds of pounds to your roof, especially after rain. This extra weight stresses your roof structure and can lead to sagging or more serious structural issues over time. Plus, moss-covered areas dry much slower than clean shingles, accelerating the deterioration of roofing materials.
Perhaps most frustrating, moss damage often voids roofing warranties. Manufacturers consider moss growth a maintenance issue, and if moss causes premature shingle failure, you’re on your own for replacement costs. That 30-year warranty becomes meaningless if moss destroys your roof in 15 years.
How to Remove Moss from Your Roof: Step-by-Step Methods
Now that you understand the urgency, let’s get that moss off your roof. There are several effective methods, from gentle to aggressive. Choose based on your roof’s condition and your comfort level with DIY projects.
Method 1: The Gentle Brush-Off
If you’ve caught the moss early and it’s just a thin layer, you might be able to remove it with simple brushing. This is the safest method for your shingles but requires the most physical effort.
Start by choosing a cloudy day when the roof is dry but the moss is slightly damp – this makes it easier to remove without creating dust. You’ll need a soft-bristled brush (never wire) or a long-handled scrub brush specifically designed for roofs. Work from the top down, gently brushing in a downward motion to avoid lifting shingle edges.
The key word here is gentle. You’re trying to remove moss, not granules from your shingles. If you have to scrub hard, the moss is too established for this method. As you work, the moss should release fairly easily. If it doesn’t, move on to a chemical solution rather than forcing it.
Method 2: The Soap Solution
For moderate moss growth, a soap solution can be surprisingly effective. Mix 8 ounces of Dawn dish soap (the blue kind seems to work best) with 2 gallons of water. Some people add a cup of white vinegar for extra moss-killing power, though this isn’t always necessary.
Apply the solution using a pump sprayer, starting at the bottom of the roof and working up to prevent streaking. Let it sit for 15-20 minutes – you’ll see the moss start to turn yellow or brown as it dies. Then rinse thoroughly with a garden hose, working from top to bottom. Never use a pressure washer on asphalt shingles; the force can strip away protective granules and do more damage than the moss.
You might need to repeat this process 2-3 times for thick moss. Between applications, some gentle brushing can help remove dead moss, but don’t force it. Dead moss will eventually wash away with rain, so patience is better than aggressive scrubbing.
Method 3: Commercial Moss Killers
For serious moss problems, commercial moss removal products are your best bet. Products like Wet & Forget, Moss B Ware, or Bayer 2-in-1 Moss and Algae Killer are specifically formulated to kill moss without damaging shingles.
Most of these products come in two forms: concentrated liquids you mix with water or ready-to-spray formulas. Follow the manufacturer’s directions exactly (more is not better with these chemicals.)
Generally, you’ll spray the product on a dry roof when no rain is expected for at least 24 hours.
The beauty of these products is that they keep working over time. The moss dies gradually and washes away with rain over several weeks. Some products also leave a residue that prevents regrowth for months. Yes, it takes patience, but it’s much safer for your roof than aggressive scraping or pressure washing.
Always check that your chosen product is safe for your roofing material and surrounding plants. Some moss killers can damage metal flashing or gutters, and runoff can kill grass and garden plants if you’re not careful.
Method 4: The Zinc or Copper Strip Solution
This is more prevention than removal, but it’s worth mentioning. Installing zinc or copper strips along your roof ridge creates a natural moss deterrent. When it rains, tiny amounts of metal wash down the roof, creating an environment where moss can’t grow.
If you already have moss, you’ll need to remove it first using one of the methods above. Then install 2-3 inch wide strips of zinc or copper under the ridge cap shingles, leaving about an inch exposed. The metal oxidizes over time, continuously releasing moss-preventing particles.
This method won’t work overnight. It’s a long-term solution that prevents future growth rather than killing existing moss. But once installed, it works well for years.
What Chemicals Work and Which Ones Won’t
The internet is full of moss removal “hacks,” but not all of them work, and some can seriously damage your roof. Let’s separate fact from fiction.
- Bleach solutions are popular but problematic. While chlorine bleach (mixed 50/50 with water) will kill moss, it also kills everything else it touches; your grass, shrubs, and beneficial soil organisms. It can corrode metal flashing and gutters, discolor shingles, and the fumes are hazardous. Plus, bleach doesn’t prevent regrowth, so you’ll be doing this again next year.
- Vinegar is often touted as a natural solution, and while it can kill moss, it requires repeated applications and only works on young, thin growth. The acidity that kills moss can also corrode nails and flashing over time. It’s safer than bleach but less effective than commercial products.
- Baking soda actually works quite well. Mix 3 tablespoons per quart of water and spray on moss. It changes the pH enough to kill moss without harming most plants. The downside? You need a lot for a whole roof, and it takes multiple applications.
- Oxygen bleach (sodium percarbonate) is gentler than chlorine bleach and breaks down into water and oxygen. It’s effective against moss and safer for plants, though you still need to protect sensitive vegetation. This is a good middle-ground option if you want to avoid harsh chemicals.
- Commercial products specifically designed for moss removal are usually your best bet. They’re formulated to kill moss without damaging roofing materials, and many provide residual protection against regrowth. Yes, they cost more than household products, but they work better and safer.
Preventing Moss from Coming Back
Successfully removing moss is only half the battle. Without prevention, you’ll be doing this again next year. Here’s how to keep your roof moss-free long-term.
- Improve sun exposure by trimming overhanging branches. Moss thrives in shade and moisture, so increasing sunlight on your roof is the best natural prevention. Even partial shade reduction makes a difference. Consider removing trees that heavily shade your roof if moss is a recurring problem.
- Keep your roof clean of debris. Leaves, twigs, and dirt hold moisture and provide nutrients for moss growth. Clean your gutters regularly and remove debris from roof valleys and behind chimneys. A leaf blower works well for this, though be careful on steep roofs.
- Improve drainage to reduce moisture retention. Make sure gutters aren’t backing up water onto the roof edge. Check that downspouts direct water well away from your foundation. Standing water anywhere on your roof creates perfect moss-growing conditions.
- Apply preventive treatments annually. Many moss prevention products can be applied to clean roofs to prevent growth. These are much easier to apply than removal products and keep working for months. Think of it like pre-emergent weed control for your roof.
- Install zinc or copper strips as mentioned earlier. This one-time installation provides years of automatic moss prevention. It’s especially effective on north-facing slopes that get minimal sun.
- Maintain proper attic ventilation to reduce moisture buildup. Poor ventilation leads to condensation, which keeps your roof damp longer. Make sure soffit vents aren’t blocked and ridge vents are functioning properly.
When You Should Call Professional Roofers
While DIY moss removal is possible, certain situations call for professional help. Here’s when to put down the ladder and pick up the phone.
If your roof is steeper than 6/12 pitch, professionals have the proper safety equipment and experience to work safely. They use roof jacks, safety harnesses, and know how to move safely on steep surfaces. What takes them an hour might take you all day, with much higher risk.
When moss covers more than 30% of your roof, you’re looking at a major project that requires professional-grade equipment and products. Professionals can treat large areas efficiently with specialized applicators that ensure even coverage and proper concentration.
If you discover damage while inspecting the moss (lifted shingles, exposed nails, or soft spots) stop immediately and call pros. Moss often hides underlying damage that needs repair before cleaning.
Seasonal Timing: When to Remove Moss on the Roof
Timing your moss removal can make the job easier and more effective. Here’s when to tackle this project for best results.
- Late spring (May-June) is ideal in most climates. Moss is actively growing but hasn’t reached full thickness. Weather is generally dry and mild, perfect for roof work. You’ll have all summer for preventive treatments to establish before wet season returns.
- Early fall (September-October) is the second-best option. Moss is fully grown but beginning to weaken. Removing it now prevents winter damage from freeze-thaw cycles. Just ensure you complete work before leaves fall and weather turns wet.
- Summer works but can be challenging. Hot roofs are uncomfortable to work on and some chemicals become less effective in extreme heat. If you must work in summer, choose early morning hours and stay hydrated.
- Winter is generally not recommended. Wet, icy conditions make roof work dangerous. Cold temperatures reduce chemical effectiveness. Moss is dormant but firmly attached. Only attempt winter removal in mild climates during dry spells.
The Bottom Line on Roof Moss Removal
While DIY removal is possible for minor moss, the smartest next step is having a professional assess the full extent of moss growth and any damage it may have already caused.
Here’s the thing: moss damage often goes deeper than what’s visible from the ground. What looks like a small patch might be widespread underneath, and those root systems could already be compromising your shingles. A professional inspection can identify hidden damage, determine if your roof structure has been affected, and create a comprehensive removal and prevention plan that actually works long-term.